Project Toolbar
The toolbar contains all the tools relating to the Project currently open.
These are:
Information
Edit Data
Project Factors
Fire design
Calculate
Project status
Publish
Page Setup
Print Preview
Export to Rich Text Format (.rtf)
Export to Microsoft Office Word 2007 (.docx)

Information

The Information section contains the information about the current project. These are based on what you specified on starting a new project. The project Name, Location and Client are always on, and you can edit these simply by clicking on the respective entry.
Edit Data

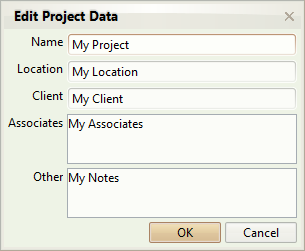
This opens the Edit Project Data dialog box which allows you to edit the full range of project data.

Settings group
Project Factors
keyboard shortcut: F4

Teretron employs default values for various factors used in Eurocode 5. These defaults are based on the general Eurocode document, with adjustments based on the National Annex for your respective version (UK National Annex for the English version).
You can edit the factors for this project by clicking on the Project Factors button. This will bring the Factors dialog for the entire project.

This dialog contains all the factors used in Teretron. You can change any value simply by clicking on the relevant entry. This will affect all calculations in the current project.
In order to help you spot immediately any changes, default values are dark grey, while non-default values are blue. You can always reset any value back to its default by clicking on the blue arrow next to it.

In order for the calculations to take effect you need to re-calculate the entire project (via Project > Calculate or by pressing F6).
You can also create a Profile for specific factor values you use often.
For a full discussion of the Eurocode factors in Teretron, see the relevant page.
Profile
You might find there are specific non-default values for the Eurocode factors you use often. You can save these changes in a Profile and import them in any project.

➙ To create a new profile:
In the Project Factors dialog edit the factors to their desired values, then click Save As. The New Profile dialog comes up. Type the name you want to save this profile under. This will now appear in the list of available profiles the next time you run Teretron.
➙ To import an existing profile:
From the Project Factors dialog click on the Profiles list box. Select the profile you want to import and click Apply. This will load the selected profile.
➙ To delete an existing profile:
From the Project Factors dialog click on the Profiles list box. Select the profile you want to import and click Delete. This will delete the selected profile.
Fire design

All cross-section and member designs can also be designed for fire according to EN 1995-1-2:2004. The fire design is in the last tab of each design.
You will often find though that you are designing an entire project with the same parameters for fire design. Instead of inputting the data for each case individually, you can define these for the entire project.
Clicking on the Fire design button brings the Fire Design dialog. Here you can define the parameters for the entire project.

In order for the changes to take effect you need to re-calculate the entire project.
Note that you can always change the parameters for a specific component through the Fire design tab of that component.
Note also that some types of design require additional inputs that are not included in the Fire design dialog. You still have to input these data manually from the Fire design tab of the respective elements.
Timber type

As with fire design, You will often find though that you are designing an entire project with the same parameters for fire design. Instead of inputting the data for each case individually, you can define these for the entire project.
Check group
Calculate
keyboard shortcut: F6

This will check the entire project, running the analysis on every component of the project.
Project Status


This is a traffic light indicator of the current status of the entire project.
- ○ A green light means that all the checks are satisfied in all the components of the project.
- ○ A red light means that one or more checks are not satisfied in one or more components.
- ○ A grey light means that one or more components do not have enough data to run the respective checks.
Print group
Publish

This will print the entire project, including the Project Information, all the components with their respective Component Information, the input data, the calculations, the results of the checks, and the relevant Eurocode references.
By clicking on the arrow below Publish you can get access to the following functions: Page Setup, Print Preview, Export to Rich Text Format (.rtf), Export to Microsoft Word 2007 document (.docx).

Page Setup
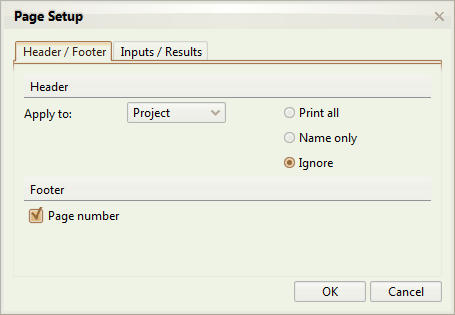
This will bring the Page Setup dialog. This has three tabs with the following functionality:
Header/Footer:

From here you can choose the contents of the header and the footer of your document.
In the header you can include the Project Name, User Name, Date and Time by selecting Print All. You can print the name only, or nothing at all by clicking on the respective radio buttons.
Note that your Teretron Serial Number will be printed by default in all calculations.
In the footer you can select if you want to include the page number or not from the respective check box.
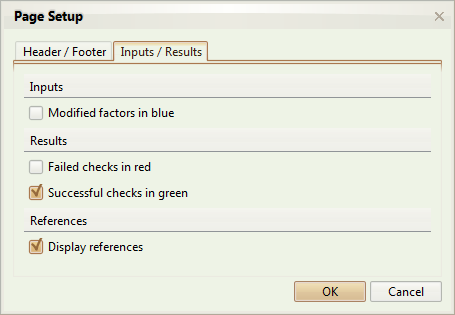
Inputs/Results:

In the Inputs/Results tab you can select some additional settings for your printing.
In the Inputs you can select if any factors with a non-default value are printed in blue color.
In the Results you can select if you want the checks to appear in red (for failed checks) or in green (for successful checks).
Finally you can choose if you want to print a detailed list of the Eurocode references used in each design case.
Print Preview
This will call the Print Preview dialog from which you can preview your document prior to printing.
Export to Rich Text Format / Microsoft Office Word 2007
These buttons allow you to export your document to Rich Text Format (.rtf) or Microsoft Office Word 2007 format (.docx) for further processing.
Please note that you should include your serial number in any formal documents containing calculations from Teretron.
